In this article we’ll cover the different types of radon fans, their applications, how to choose a radon fan, and, why bigger, isn’t always better.
All radon fans are not the same and each has its own specific application. Knowing how to choose the right radon fan is important, because it’s a large factor in how effective your radon mitigation system is at reducing your family’s risk to lung cancer.
Get Your Free Radon Mitigation Estimate
Best Radon Mitigation Fan Manufacturers
There are many radon fan manufacturers to choose from, but the big three are RadonAway, Festa, and Fantech.
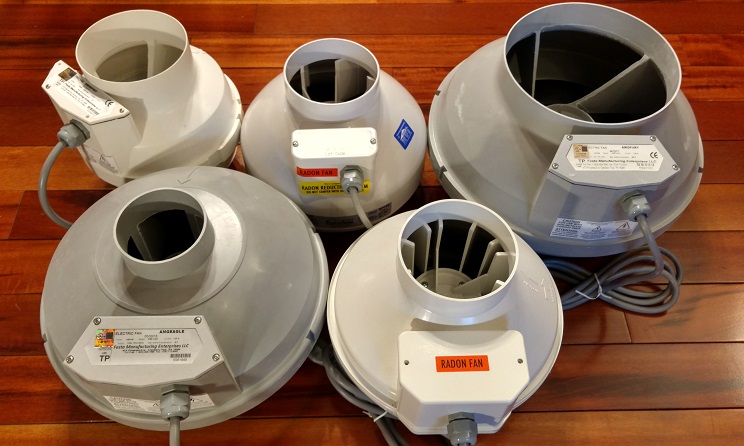
Radon Fan Types
There are three main categories of radon fans to choose from.
- Low suction, low airflow
- Moderate suction, moderate to high airflow
- High suction, low airflow
Want to learn how to choose a radon fan?
Low Suction Radon Fans
These fans are primarily used when there is drain tile or 4 to 6 inches of gravel under your home. In addition, they’re often used to activate a passive radon reduction system that was installed when your home was being built.
These fans are the quietest and least expensive to operate, typically using $20 to $30 worth of electricity each year.
Examples of these fans include:
- RP140 by RadonAway
- Spirit by Festa
- RN1 by Fantech
Moderate Suction Radon Fans
These radon fans are suitable for medium to large homes that have gravel or drain tile under the concrete slab. They can move lots of air and don’t have to suck very hard to do it. That means the material under your home is porous or there might be a lot of cracks and openings in the slab. Houses with drain tile and concrete block walls tend to be the leakiest.
Openings to the soil should be sealed whenever possible, so that the radon system isn’t drawing conditioned air (air you are paying to heat and cool) out of your home. A radon system that draws too much air from inside your home can cause appliances like your water heater to backdraft. Consequently, your family is at serious risk to the dangers of carbon monoxide. Back drafting is however, a whole new ball of wax and we’ll cover it in another blog.
Moderate suction fans consume $55 to $140 worth of electricity every year. High flow fans are somewhat noisy, and for that reason, you might want to consider adding a noise suppressor.
Examples of these fans include:
- RP145, RP260, RP265, RP380, XP151, XP201, XR261, GP201, GP301, and SF180 by RadonAway
- Maverick, Hawk, Prowler, Legend, Patriot, and Fury by Festa
- RN2, RN3, and RN2SL by Fantech
High Suction Fans
In contrast, with tight soils like clay and sand it’s best to use a high suction fan. If the soil below your home is tight, you may sometimes need more than one suction point to create vacuum under your whole house.
High suction fans add $100 to $175 a year to your electric bill. They’re quite noisy and as a result, are a good candidate for a noise suppressor, especially it the radon fan will be near a bedroom or deck.
Examples of these fans include:
- GP401, GP501, GP500, and GX5 by RadonAway
- Force, Eagle, and Eagle Extreme by Festa
- RN4EC by Fantech
How Do We Choose Which Radon Fan to Use?
Good question! We test and measure. Often the key to getting your radon levels really low, is to create suction under your entire home. Therefore, by measuring both the pressure and the airflow we can determine the number of suction points, the size of the vent pipe and which fan is right for your home.
We need to know the following:
- How far is the area of negative pressure or suction reaching? This is known as pressure field extension or PFE.
- How much air do we need to move to get the desired strength of PFE?
- At what pressure does the radon fan have to operate in order to overcome the resistance of the soil and the vent pipe to produce the airflow needed?
What Is Pressure Field Extension?
Let’s say our suction point is in the mechanical room on one side of your basement. We want to be certain that we are reaching, and mitigating, the bedrooms on the other side of the basement where your kids might sleep. We do this by measuring the pressure field extension. In other words, how far the suction created by the radon system reaches under your home.
Diagnostic Test Holes
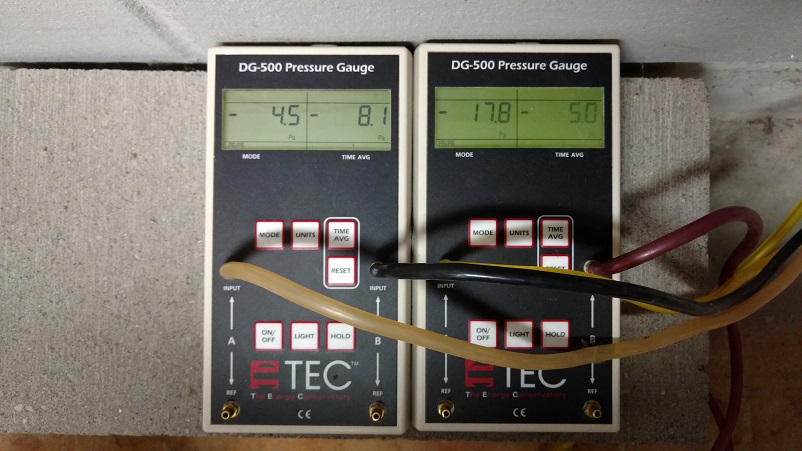
First, we’ll drill several diagnostic test holes through your basement floor and into the soil below. These test holes will be in different areas of your basement, so we can determine if the radon system will mitigate those areas or if we’ll need additional suction points to do so. Second, we’ll attach a micromanometer (pressure gauge) to the test holes and record our baseline readings before applying any suction.
You’ll notice that the reading on the micromanometer shown below, is a positive number. This means that radon is being drawn into the home and is the whole reason there is a radon problem to begin with. Basements suck, literally! They naturally draw radon laden, soil gas into your home. We need to make these positive numbers negative and we do that by creating suction (negative pressure) under your home.

The tubing from the test holes is brought to one central location so the micromanometer readings can be seen at the same time.

How Is Airflow Measured?
Once we do diagnostic testing to figure out where the best location for your suction point is, we create one. To do this, we core a 5-inch hole through the floor and remove 5 to 40 gallons of material. As a result, we have a void, with a lot of surface area, for the mitigation system to draw from. If you have tight soil, your suction point should be larger. In other words, the harder the digging, the larger the suction point needs to be. Clay soils, for instance, need very large suction points because they are very hard to draw air through.

Second, we’ll attach a pitot tube (an instrument used for measuring airflow) over the suction point. The pitot tube, when used in combination with a shop vac, allows us to measure and adjust the amount of vacuum and airflow we apply to the suction point.
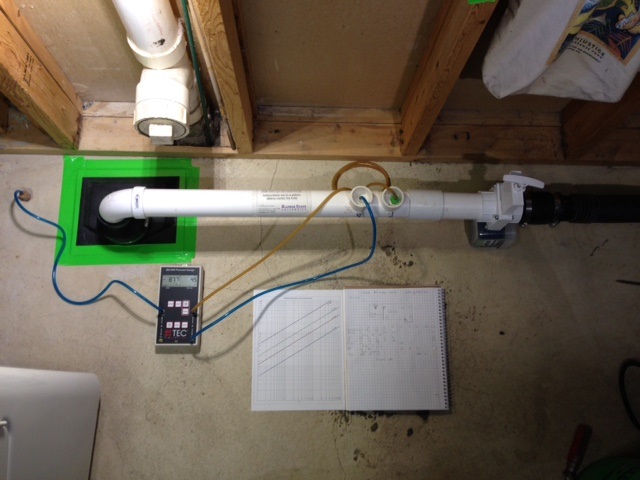
Measuring Pressure Field Extension
Next, we fire up the shop vac and apply vacuum to the suction point. Consequently, we should see the pressures on the micromanometers start to go negative indicating that we have suction in that area of your home.
By manipulating the slide gate valve, we can adjust the amount of suction and airflow. As a result, it allows us to simulate several different radon fans prior to installation so that we know if the design will work before committing to it.
In the cooling season, we are hoping to get negative five Pascals in our weakest, or furthest test hole. However, during the heating season we shoot for three Pascals negative. Doing so, allows us to have a buffer, because your home will fight against the radon system when you turn on the dryer or exhaust fans. If we are just slightly negative, however, the things that exhaust air from your house may, in fact, overpower your radon system and cause radon entry into the house.
What Size Pipe is Needed?
Now, we can calculate the amount of air the radon fan will have to move in addition to the amount of friction loss that the vent pipe and fittings will create. Think of friction loss as putting kinks in a garden hose, the more kinks you have the less water you get. Likewise, the same is true when you add fittings to the vent pipe of a mitigation system, the more fittings the less airflow. If there is going to be substantial friction loss, it is best to go with a larger diameter pipe. Larger vent pipe will never hurt performance.
These are the vent pipe sizes we typically use based on cubic feet per minute (CFM).
- If it’s under 40 CFM, we might use 2-inch diameter PVC pipe.
- Under 70 CFM, 3-inch pipe.
- If it’s over 70 CFM, we’ll use 4-inch pipe.
And Finally, We Choose A Radon Fan
After we install the vent pipe, we then attach the radon fan that meets the specifications we calculated earlier. With the radon fan on, we then confirm that we have the desired amount of suction in the diagnostic test holes. If however, the suction is too strong or is too week, we may want to select a different radon fan.
It’s important to mention that we will not install a low suction fan on a radon system that is drawing on a tight subsoil such as clay or sand. This is because radon fans need to move a small amount of air in order to stay cool and prevent them from overheating. When we choose the radon fan, we are careful to ensure that it doesn’t exceed the manufacturer’s maximum recommended operating pressure.
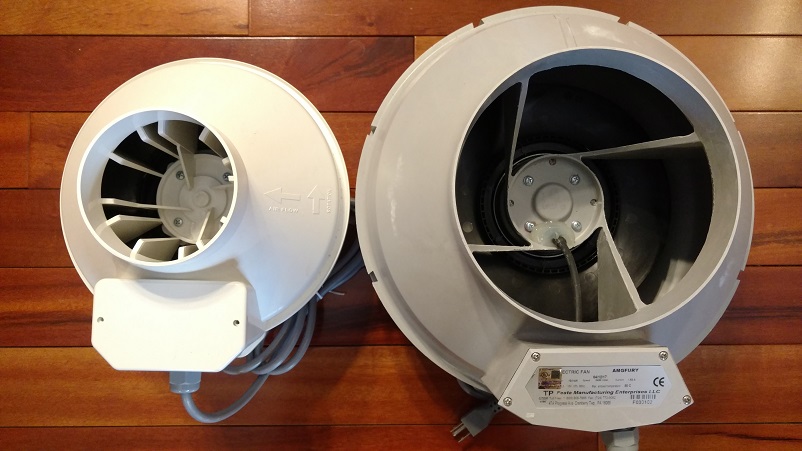
Why, Bigger Isn’t Always Better
You may be tempted to choose a bigger radon fan thinking that it will get your radon levels lower. Don’t be. Doing so may be a costly mistake that can lead to increased energy bills, and quite possibly, the deadly back drafting situation we talked about earlier.
What Did We Learn?
First, we learned that radon fan selection has more to do with the type of soil below your home and less about the size of the fan. Second, that the key to getting your radon levels as low as possible, is to create suction under your entire home. Next, we learned about the importance of diagnostic testing and that it’s the only way to ensure that every part of your home is being mitigated. In conclusion, we found out how to choose a radon fan, and that when it comes time to choose, bigger, isn’t always better.
Choose a Radon Mitigation Contractor Who Tests
Radon is a radioactive, cancer causing gas and there’s no safe level. The lower you can get it, the better off your family will be. Be sure to choose a qualified radon mitigation contractor that takes the time to do diagnostic testing.
